Quantcast
Channel: Bible Class Creations
Viewing all 62 articles
Browse latest View live

Balaam's Talking Donkey Craft

$
0
0


Balaam's Talking Donkey Craft
Numbers 22:21-39

The exciting part of this donkey is that his mouth can actually move (with a little assistance)!  In the Bible story, Balaam's donkey talks to Balaam. When that part of the story is told, the teacher (or child) can open and close the clothespin to make the donkey pretend to talk to Balaam.

For the donkey in the picture, I used a Cricut machine.  I used Noah's ABC Animals cartridge and put the setting on 9 inches.  For people who do not have a Cricut or this cartridge, I have designed and included a pattern. Click on the words "donkey pattern" in the instructions section. 

I always want the children to make something to retell the story at home. Fo them, I shrink the pattern and print it onto card stock. They can choose to color it however they prefer.  They will follow the instructions below. Smaller clothespins (often found at Dollar Tree) will be necessary for making their smaller donkeys talk. 

Instructions:
  • Print out the donkey pattern onto plain or colored card stock.
  • Color it if desired.
  • Cut it out.
  • In order to make the donkey able to talk, cut on the dotted line where his mouth would be.  
  • Tape or glue a clothespin on the back.  Line up the center opening of the clothespin with the mouth. (See pictures above.)
  • Open and close the clothespin to make the donkey talk.

Zacchaeus Climbs the Tree

$
0
0

Zacchaeus
Luke 19:1-10


Zacchaeus gets to climb this tree (with the help of a few strings).  Watch the video to see the full effect. (It may take a few seconds to load.)

Instructions:
  1. Print and cut out the Zacchaeus in color or in black and white.  Click here for a printable Zacchaeus.
  2. Cut two pieces of a straw about 2 inches long.
  3. Tape the straw to the back of Zacchaeus at a slant.  Make sure the widest part of the slant is at the bottom. See picture below.


  1. Cut two pieces of string around 22 inches long.
  2. Slide one piece of string through one straw.
  3. Tie a bead on the end of the string so it won't go back through the straw.
  4. Repeat those steps for the other string.
  5. Tie the other end of the strings to a popsicle type stick that has grooves in it so it won't slide on the stick.  (See picture below.  I found these at Hobby Lobby.)


  1. Cut another piece of string about 12 inches long. 
  2. Tie it on a large loop around the center of the stick.  Since there is no groove to hold it in place, tape it in place.
  3. This string can be hung on a doorknob and Zacchaeus can climb there (without the tree).  This is what I do when I allow the children to make one of these to take home.  They don't make a tree.
  4. To make Zacchaeus climb, pull on each string alternately like in the video.  
  5. To let Zacchaeus come back down to see Jesus, just let the natural weight of Zacchaeus slide down the string by letting the string go.

The Zacchaeus pattern was made with clip art from the book Bible Story Clip and Copy Patterns by Corbin Hillam.  This is one of my favorite books to use as patterns for many, many things!  This precious book is no longer in print, so Mr. Hillam has graciously allowed me to give you the pattern for free.  He is producing a CD with the art from this book.  The drawings are fantastic!  If you would like to purchase a CD for $15, you can contact him at corbinhillam@yahoo.com.  It is well worth the money!  Other items by him can be seen at www.corbinhillamdesign.weebly.com.


Bubble Wrap Fish

$
0
0

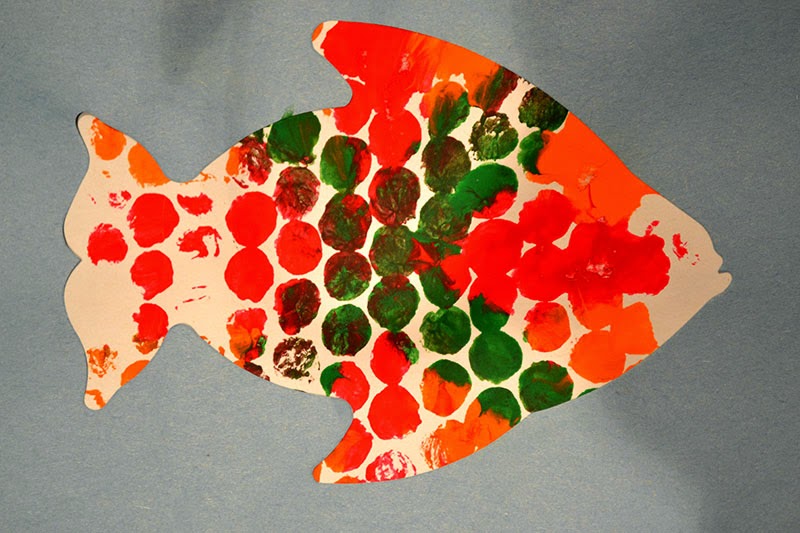
Bubble Wrap Fish

I used a die cut for the fish.  I covered the table with plastic then let the kids use bubble rap for paint. 


Pour paint onto a paper plate. Choose any color(s) you wish.  Lay a piece of bubble wrap (bubble side down) onto the paint.  Pick it up and "stamp" the fish with it.  Glue the fish onto blue paper.


Naboth's VIneyard Pop-Up Page

$
0
0
Ahab and Naboth's Vineyard
I Kings 21

King Ahab desired to own Naboth's vineyard to use as his own vegetable garden because it was so close to his palace.  When Naboth refused, scripture says that Ahab "lay in his be sulking and refused to eat."

I created this pop-up page for the children to take home and retell the story. I used scrapbook paper for the floor and wall. 

Instructions:
  1. Cut a piece of scrapbook paper (or just use construction paper) to 9 x 12 inches.
  2. Make the page into a pop-up page.  For instructions, click here.
  3. Find a picture of a beautiful vineyard and print it out.  Please watch for copyrighted photos. 
  4. Cut out a frame to fit around the photo to look like a window frame.
  5. Glue the frame to the photo.
  6. Print and cut out the bed and Ahab.  For pattern, click here.
  7. Glue Ahab on the bed as if he were laying on it.  
  8. Glue Ahab and the bed to the pop-up tab (not to the back wall).  Fold the page while the glue is still wet to make sure the bed is in the correct position.
  9. Glue the photo of the vineyard on the back wall.


Words Can Hurt Object Lesson

$
0
0

Mimosa Pudica Plant
Also known as "Sensitive Plant" 

I came across this marvelous plant in Houston, TX, when I was visiting there. A friend took me to the Brookwood Community, "a nonprofit, residential facility and vocational program for adult with disabilities." This place was incredible! To learn more about it or visit there, go to www.brookwoodcommunity.org.  You will be glad you did.

While I was there, I ventured into their garden shop and found the most incredible plants.  I had to purchase some, not only because they were absolutely gorgeous but because everything I purchased there benefited these fantastic adults with disabilities.

This one particular plant caught my attention because of its potential for an object lesson in Bible class.  This plant is very sensitive.  When you touch a leaf (pictured below), it's self defense mechanism immediately kicks in.  That causes the leaf to close up fairly quickly and the stem to wilt giving the predator the impression that it is dead. Therefore, it would not be worth eating!  Pretty cool.


Close up view of the wilted leaf.

If you touch very many of the leaves, the whole plant looks distressed and totally wilted like this. To see a short video of how this works, click here.  After about an hour, the plant will recover to look full and beautiful again.

In Bible class, we will pretend that the plant is Jesus.  Every time we sin, it is like someone touching a leaf and hurting Jesus.  The more sin we have (or the more people who sin), the more hurt Jesus feels.  

Another way to use this plant to talk about how our words affect other people. If you say something negative to someone, call them names, or lie to them, it would be like touching one or two of the leaves.  When touched in that way, they wilt.  People are like that.  When we say ugly things to them, they wilt on the inside.  When other people say something negative to that person or you say more negative things to them, more of their leaves and stems wilt. Pretty soon, not only is that person wilting on the inside, you can also see that person looking sad and wilted on the outside.

The good news is that over time, if the negative (touching the plant) is taken away and mostly positive things are there (living like Christ), the person (and the plant) can recover and be like new.


Frayed Knot

$
0
0

Frayed Knot Lesson

When studying Bible stories where people might be afraid such as when Jesus Calming the Storm, the Twelve Men who went to Spy on Canaan, Moses and the Israelites in Egypt, Elisha and the Blinded Syrians, and more, reading scriptures and discussing times when not to be afraid is more than appropriate.  

Print off the page in the picture for each child. Have the children draw a picture and, if possible, write a sentence about something they are not afraid to do because Jesus is with them.  Tell them to think about something they feel brave about. Let the children share with others what they have drawn.

Read some of the following scriptures and discuss why we should not be afraid.  
  • Deuteronomy 31:6
  • John 14:27
  • Romans 8:28
  • Psalm 27:1
  • Joshua 1:9
  • I John 4:18
  • I Peter 5:7
  • Proverbs 3:5-6
  • Isaiah 41:13

Cut a piece of thin rope about 6 inches long for each child.  Tie a knot close to each end of the small rope  (or have the children do this).  Fray the pieces on the ends that are sticking out.  Tell them that this is a "frayed knot". Tell them to put these tiny ropes in their pockets so that when they feel afraid, they can reach in their pocket and be reminded that if we have Jesus, we can be "afraid not".  We will not be afraid because we read of the promises God made in the above verses.  We will also be "afraid not" to share those verses with others who are afraid.

For printable page like pictured above, click here. The printable page is not distorted like the picture above.


Parable of the Sower and the Seed Movie

$
0
0
The Sower and the Seed
Luke 8:1-15
A Kids' Modern Day Application Movie

When teaching this parable to elementary children, I wanted them to make sure they understood what this parable means to them today.  So, as a class, we created a modern day application movie.  I split the class into groups.  The children created and performed skits based on their section of the parable. I videoing the skits in the order in which the parable describes them. 

Group 1 had verse 12 "Those along the path are the ones who hear, and then the devil comes and takes away the word from their hearts, so that they may not believe and be saved." (The kids acted out friends who taught their friend about Jesus, but other people talked him out of ever going back to church or learning more about Jesus again.)

Group 2 had verse 13 "Those on the rocky ground are the ones who receive the word with joy when they hear it, but they have no root.  They believe for a while, but in the time of testing, they fall away."

Group 3 had verse 14 "The seed that fell among thorns stands for those who hear, but as they go on their way they are choked by life's worries, riches and pleasures, and they do not mature."

Group 4 had verse 15 "But the seed on the good soil stands for those with a noble and good heart, who hear the word, retain it, and by persevering produce a crop.

The kids did an outstanding job of acting out scenes that would occur at school or home or playground that represented all four scenarios.

After church, I electronically sent the videos to each child so they could show their friends and family. (I made a DVD for some who didn't have internet access.) Thus, they were able to retell that story to many people and were very excited to do so!


Advanced Preparation:
  • If necessary, ask extra adults or teens to assist with this project. I recruited one adult for each of the four groups.
  • Obtain video equipment (a video camera, iPhone, iPad, or something like that)
  • Prepare assignments for each group.
On the Day:
  • Assign children to 4 groups.
  • Give each group a copy of the parable highlighting the section that they are creating a skit for 
  • Explain to each group that they are to create a modern day skit focusing on one particular part of the parable.  For example, one group focuses on what it would look like at school or on the playground if the seed was falling on rocky soil 
  • Have each group go to different areas of the room or a different room to plan and practice their skits with a specified time to rejoin as a large group.
  • Come together as a large group.
  • Each group performs their skit (in the order of the Bible parable) as someone videos it.
  • Send the video to each child through e-mail, Dropbox, or make a DVD to give to each child.
For printable list of these directions with highlighted pages for each group, click here.

Gideon's 300 Chosen Men

$
0
0

God Chooses 300 Men
Judges 7

Gideon had to follow God's instructions when choosing an army to fight Midianites.  God told him there were too many men.  Having too many men would not show God's glory and power.  The first set of instructions to follow was that Gideon was to say to the people, "Anyone who trembles with fear may turn back and leave Mt. Gilead." Gideon followed God's instructions exactly and 22,000 men left.

God said there were still too many and gave him more instructions.  He told Gideon to "separate those who lap the water with their tongues as a dog laps from those who kneel down to drink." 300 lapped like dogs.  God told Gideon to send the others home.

In the middle of the night, God told Gideon to take his servant and go listen to what the Midianites were saying so he would have courage.  Gideon did so.
After a short, surprise battle, God gave Midian over to Gideon and his army.

If Gideon had not followed God's instructions, the Lord would not have let the battle be successful.

God has given us a set of instructions on how we ought to live our lives.  It is called the Bible.  If we follow His instructions, we will win our battles and join Him one day in Heaven.

I give the children all the materials they need to make this project at one time.  (I don't typically do that because they get in a hurry and don't wait for instructions.)  I tell them to wait for instructions so their project will turn out the right way.  

I begin giving them instructions:
  1. Draw a face on the BACK of the spoon.  Then I wait until they are finished.
  2. Then give another instruction:  Tape the spoon to the back of the card with the face showing.  Then I wait until they are finished.
  3. At this point, the puppet I bring to class each week "makes" the craft like theirs but does not wait for instructions. (This could be done by a class helper.)
  4. I tell the kids to tape the pipe cleaners on to be the hands (showing them an example).  See top picture of finished product.
When we are all finished, we show our projects.  I have a bear puppet (or a helper in the room) who made his but did not wait for instructions.  He shows his but gets very sad because his didn't turn out right (see 2nd picture).  We talk about what happens when we don't follow instructions - it doesn't turn out right.  When we don't follow God's instructions, our lives don't turn out right either.  

Then I give the bear puppet a chance to remake it and follow instructions which he does very well.  Following God's instructions is always the correct thing to do.

Click on the picture to print out the words to this project.


Jesus Loves the Little Children Pop-Up

$
0
0

"Let the little children come to me."
Matthew 19:14, Luke 18:16, Mark 10:13-16

Children love to make pop-up pages.  For instructions on how to make a pop-up page, click here.

Instructions for this page:
  1. Cut one piece of grass border to match the width of the paper.
  2. Cut out 8 little children and clothes.  I used a Cricut machine.  
  3. Cut out 1 Jesus and clothes.  I used a Cricut.
  4. Glue 3 children to the back of the left side of the grass border.
  5. Glue 3 children to the back of the right side of the grass border.
  6. Glue the Jesus figure to the middle of the top page.  Have him stand on the piece that pops out.
  7. Glue one child on either side of the Jesus figure.
  8. Glue the grass border with the children onto the piece that pops out.
  9. Fold it while the glue is still wet to make sure it folds correctly.


Peter and John in Front of the Sanhedrin

$
0
0


Peter and John in Front of the Sanhedrin
Acts 4:1-22

Pop-up books like these are always a favorite of the children.  The jail is the first part that pops up.  

Instructions for making the pop-up jail:
  • Fold a piece of blue construction paper in half.
  • Cut a small rectangle from black paper and cut slits to be the bars. 
  • Fold the black paper in half.  
  • Fold each end of the black paper under about 1/4 - 1/2 an inch. 
  • Glue one fold to the top half of the blue page. 
  • Glue the other fold to the bottom half of the blue page.  
  • Fold the blue page in half again while the glue is still wet to make sure it will close correctly.
Instructions for making the people stand up:
  • Cut a small rectangle about 2 inches by 1 inch.
  • Fold one end of the rectangle about 1/2 inch.
  • Glue the folded end of the rectangle to the page allowing the rest of the rectangle to stand up.  (See pictures)
I made the people using a Sizzix little body die cut machine.  A coloring page pattern or other small person pattern will work. 

When reading about Peter and John sitting in prison, set the men in the prison.  When reading about them standing in front of the Sanhedrin, lean them up against the small blue standing rectangles.  

When letting the Kindergarten or First Grade children make one, I put a mark where they should glue the jail pieces.  It makes it a little easier.

Other stories that the pop-up jail craft could be use with include Paul and Silas in Prison (Acts 16) and an Angel Frees Peter from Prison (Acts 12).


Achan's Sin Takehome

$
0
0


Achan's Sin
Joshua 7
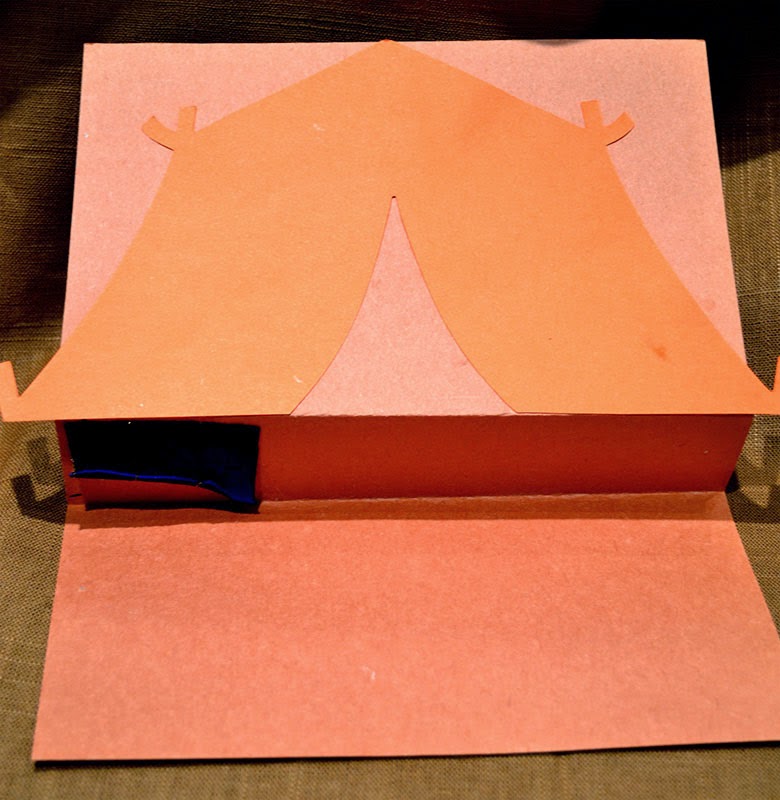
Movable pages can be a fun way for the children to retell the story.  Children can make one of their own and discover the robe, shekels of silver and bar of gold under Achan's tent.  

Instructions:
  • Get one piece of brown construction paper.
  • Turn it portait style.
  • Cut out a tent and glue it close to the top of the page. For a tent pattern, click here. (This pattern is smaller than the tent pictured.)
  • Cut a small piece of fabric to be the robe.
  • Cut a small piece of gold paper to be the bar of gold.
  • Hole punch several small circles from silver paper to be the shekels.
  • Glue them into place between the two folds.  (See pictures above.)
  • Fold the tent over the pieces to hide them.

God Descends Like a Dove on Jesus

$
0
0

Jesus' Baptism
Matthew 3:13-17

Children enjoy moving the dove on this wooden movable craft project.  I found the wooden cloud and blue bird (already painted) at Michael's and Hobby Lobby.  Since the bird was blue, I used white acrylic paint and painted it white to be the dove.  I hot glued a string to the back of the dove.  To enable the string to move on the back of the cloud, I used two pieces of Scotch tape. Where the string is going to pull through, I overlapped the tape so that there was a smooth surface (rather than a sticky surface) in the middle section. Then I stuck the leftover edges down to the back of the cloud.  Just pull the dove or pull the string to make the dove move.  

The bird project could also be used as the dove that Noah sent out (Genesis 8) or the ravens that feed Elijah if painted black (I Kings 17).


Baby Moses Pop-Up Page

$
0
0


Baby Moses
Exodus 2

Everywhere I go, I look for pretty bulletin board borders that can be used for various things.  I found some beautiful grass border and used it to make a pop-up page the children can make and take home.  For instructions on how to make a pop-up page, click here.

Instructions:
  • Cut two strips of the grass border the same size as the width of the page.
  • With a glue stick, glue one piece of the grass border to the back of the page. This one will sit right above the pop-up piece shown in the pop-up page instructions.
  • Glue the other piece of the grass border to the small square that pops out (see instructions page).
  • From a strip of border that looks like wood, cut a small basket.
  • Set the basket between the two layers of grass border but do not glue it.
  • Children can pretend to float the basket down the river between the reeds.


What is a Miracle?

$
0
0
My friend, June Hill, was attempting to explain to her students what a miracle is.  In an effort to demonstrate a miracle, she performed this magic trick.  At the end, she explained that what she had done was a simple magic trick. She showed them how she had done it.

She told them that miracles may look like magic tricks because they are surprising, but they are not magic tricks.  Instead, miracles are surprising events that take place due to supernatural powers from God.  She went on to teach a series of lessons on the miracles of Jesus.

The first thing she did was put a penny in the middle of a blank sheet of white paper.

Then she got a clear drinking glass and a rolled up a black piece of construction paper (that had been taped to stay rolled up).


She put the rolled up construction paper over the drinking glass.


Then she picked up the glass (with the paper still on it) and placed it on top of the penny.


When she took the piece of black paper off the drinking glass, the penny had disappeared!


The trick to this illusion is that she had attached a piece of white paper to the bottom of the drinking glass before she set the drinking glass on the larger rectangle piece of paper.  When the glass was set on the larger white paper, no one could see the white paper attached to the drinking glass.  Placing the black paper over the glass helped keep the children from seeing the white paper on the bottom of the glass when she moved it and placed it on top of the penny.


Jesus Heals the Ten Lepers Shadow Story

$
0
0

Jesus Heals the Ten Lepers
Luke 17:11-19

This story is told using an overhead projector.  

  1. Click here to print out the pattern pieces.
  2. Cut out the people.  Print six of the people standing in a group with their arms down.
  3. Using a hole punch, punch leprosy dots out of four of those pictures of people standing in a group with their arms down.
  4. Turn the overhead projector on and show only the pieces listed above when telling the story.
  5. Pulling the overhead projector backwards makes the people look more life- size if you want.  
Click on the top picture to print out the instruction page.

Special thanks to Beverly Scott for permission to share the Shadows of Imaginality patterns!


    Aaron's' Staff Turns to Snake Storytelling

    $
    0
    0

    Aaron's Staff Turns to a Snake
    Exodus 7:8-13
    I found these large plastic snakes in the toy section of Dollar Tree.  (I found some similar ones that are much, much smaller in the birthday party favor section.) When telling the story, I give each of the children one of the small ones.  They hold it so that you can only see the blank yellow side.  This is the "staff" or "rod".  

    I use the larger snake. Actually, I purchased two of them, disconnected the head from one of them, and joined the two snakes to make one really long one. I hold the head in my hand and let the rest fall straight down by my side showing the blank side.  This is Aaron's rod.

    When I throw down my "rod", I make sure to turn it so that it falls with the snake skin showing.  My rod turned into a snake.

    Then Pharoah's magicians did the same thing.  So the children toss theirs down and all of their's become snakes as well. 

    I let the children take the little snakes home so they can retell the story.

    Cake Decorations as King's Palace

    $
    0
    0

    We used cake decorating steps and cake decorating pedestals to make a storytelling prop for telling stories that include king's or queens.  This could be used for the story of Esther, Hezekiah's Illness, or many other stories with kings and queens.

    Moses Climbs Mt. Sinai

    $
    0
    0


    Moses Climbs Mt. Sinai
    Exodus 19 - 20

    Moses gets to climb Mt. Sinai (with the help of a few strings).  Watch the video to see the full effect.


    Instructions:
    1. Print and cut out the Moses in color or in black and white.  Click here for a printable Moses.  Then Ten Commandments are not connected.  This is on purpose so that when you begin telling the story (when Moses is at the bottom of the mountain), he does not have the Ten Commandments. When he reaches the top, tape the Ten Commandments onto his hands and help him "climb" down.
    2. Cut two pieces of a straw about 2 inches long.
    3. Tape the straw to the back of Moses at a slant.  Make sure the widest part of the slant is at the bottom. See picture below.

    1. Cut two pieces of string around 22 inches long.
    2. Slide one piece of string through one straw.
    3. Tie a bead on the end of the string so it won't go back through the straw.
    4. Repeat those steps for the other string.
    5. Tie the other end of the strings to a popsicle type stick that has grooves in it so it won't slide on the stick.  (See picture below.  I found these sticks at Hobby Lobby.)

    1. Cut another piece of string about 12 inches long. 
    2. Tie it around the center of the stick but tie the string in one large loop like a necklace or bracelet.  Since there is no groove on the stick to hold it in place, tape it in place.
    3. This string can be hung on a doorknob and Moses can climb there (without the mountain).  This is what I do when I allow the children to make one of these to take home.  They don't make a mountain.
    4. To make Moses climb, pull on each string alternately like in the video.  
    5. To let Moses come back down from Mt. Sinai, just let the natural weight of Moses slide down the string by letting the string go.

    The Moses pattern was made with clip art from the book Bible Story Clip and Copy Patterns by Corbin Hillam.  This is one of my favorite books to use as patterns for many, many things!  This precious book is no longer in print, so Mr. Hillam has graciously allowed me to give you the pattern for free.  He has produced a CD with the art from this book.  The drawings are fantastic!  If you would like to purchase a CD for $15, you can contact him at corbinhillam@yahoo.com.  It is well worth the money!  Other items by him can be seen at www.corbinhillamdesign.weebly.com.

    Adam and Eve Craft

    $
    0
    0


    Adam and Eve
    Genesis 2

    For this craft, we purchased these die cut people purchased at a teacher's supply store such as Mardel's; though you could easily find a gingerbread man type of pattern on the internet.  The kids cut Eve's clothes out of animal print tissue paper and glued them on using a glue stick.  For Adam's clothes, they used a leaf stamp. When they were finished, the children drew hair or glued yarn hair on each one (not pictured here).

    Esther Blacklight Story

    $
    0
    0


    Esther

    One way to tell a story is by using blacklight.  A super easy way to make a blacklight story is to simply cut out pieces using flourescent paper. I used flourescent poster board so the pieces would be sturdier.  You can use copy weight paper and glue it onto black paper for a similar result. (I like to test my paper under the blacklight before cutting out my pieces as I have found some papers react to the blacklight differently than I thought they would.)

    I cut out these pieces using patterns from a book entitled Shadows of Imaginality by Beverly Scott and Jana Smith.  (The book is no longer in print so they graciously gave me permission to put the patterns on the blog.  A huge THANK YOU goes out to them as I use these patterns for many things!)

    I enlarged the patterns for the people to make them larger.  I did not have a table pattern so just free-handed a table with items on it. 

    The children love the fact they they can move them and tell the retell the story using these pieces and a blacklight.  The people can be flipped over to be facing a different direction too.

    Click here for patterns from the book.

    Another option for this story is to print out the patterns as they are.  Cut around them.  Place the black pieces on an overhead projector and have the life size images showing on the wall.
    Viewing all 62 articles
    Browse latest View live