Quantcast
Channel: Bible Class Creations
Viewing all 62 articles
Browse latest View live

Saul's Conversion

$
0
0


Saul's Conversion
Acts 9:1-19


Verses 18 - 19 say, "Immediately, something like scales fell from Saul’s eyes, and he could see again. He got up and was baptized,and after taking some food, he regained his strength."

This visual will allow the children to see "something like scales" magically falling from his eyes. (See the first picture.)  I made the picture of Saul poster size.  I colored it using pastel chalks and laminated it.   I cut out two ovals from white paper so his eyes would not show through the "scales".  The "scales" were made from 8 layers of wax paper.  

To attach the "scales", I used an Exact o knife to cut slits just above the eyes.  I made the slits just large enough for the small part of a small paper clip to fit through.  I then layered one white oval and 8 wax paper ovals on each eye.  The paper oval is on the bottom.  I put the "scales" between the paper clip and his face.  (See closeup picture.  The kids cannot see this if the picture is a small distance away from them.)

On the back, you see the paper clips.  I attached a short string to each paper clip and then to a popsicle stick.  I looped a short string around the popsicle stick and taped the top of that string to the poster.  This loop will keep the popsicle stick in place until you need to move it.

For the fun visual effect, show the children the face and talk about it.  When you get to the part where the scales fall off, pull the popsicle stick upward slowly with your thumb.  The scales will begin to slide off one or two at a time.  (Practice ahead of time.  Pulling too fast does not get the correct effect.)

The head was made with a pattern from the book Bible Story Clip and Copy Patterns by Corbin Hillam.  This is one of my favorite books to use as patterns for many, many things!  This precious book is no longer in print, so Mr. Hillam has graciously allowed me to give you the pattern for free.  He is producing a CD with the art from this book.  The drawings are fantastic!  If you would like to purchase a CD for $15, you can contact him at corbinhillam@yahoo.com.  It is well worth the money!  Other items by him can be seen at www.corbinhillamdesign.weebly.com.

Click here for instructions and pattern.

The pattern is on an 8 1/2 X 11 paper.  Feel free to make it larger. 


Shadow Box Puppet Stories

$
0
0

Tell any Bible story using shadow puppets.  This is a great technique for those stories which are difficult to find pictures or visuals for. 


Get an empty box.  Cut off the bottom of the box.  Cut all the tabs off the top of the box except the longer two tabs.  These tabs will help stabilize the box when you are telling stories.  Cover the bottom of the box with two layers of white tissue paper.


Fold the other two tabs toward the inside of the box and secure with packing tape or duck tape.


Set the box on a table and shine a flashlight from the open end.  (I discovered that the best flashlights to use are those with LED lights.  They have the most even light rays.  The others tend to have a big circle in the middle which distorts the picture.  This tiny pink LED flashlight from Wal-Mart does a fantastic job.)


Make puppets from black or any dark construction paper.  I used a die cut for these but any pattern for people, animals, and objects will work.  Let the children retell the story over and over using this puppet stage.

God Calls Samuel PowerPoint

$
0
0
God Calls Samuel
I Samuel 3:1-21

This PowerPoint tells the story of God calling Samuel.  There are no words to the PowerPoint.  The words are found in the Bible.  I used the NIV when making this PowerPoint.  I tell the children that Samuel was really older than this little Barbie so we pretend he is a teenager.

Click here for the PowerPoint.  Scroll down to Samuel.

Ananias and Sapphira Rhebus Story

$
0
0
Ananias and Sapphira
Acts 5:1-11

Young children like to help read the story, so I make rebus stories for them.  Rebus stories are stories that have some pictures in place of some words.  This one tells the story of Ananias and Sapphira.  I usually print it out on 11 x 17 paper so all the children can see it.  Then each child gets to take home one on an 8 1/2 x 11 piece of paper so they can tell the story to someone else.

To print, click here.

Ten Plagues Photo Album

$
0
0


Ten Plagues
Exodus 7-11

Another way to tell a Bible story is to dress up as if you were one of the characters and tell the story from that character's point of view.  For this one, I dress up like Pharaoh's daughter and use a very simple photo album to tell my story.

I found free pictures on the internet and put them into a Word document.  Then I added the text to the top of the page.  I printed each page out and put them in the photo album (purchased from the Dollar Store).  I tell the story as if it really happened to me and these are pictures of my land and my house.

I was unable to contact the owners of the photos so I do not have them posted here.  You will need to search for your own pictures.  For the Nile turning to blood, I colored the water red with a marker.


Game Boards

$
0
0

Generic Game Boards

I like to make these generic game boards using file folders and stickers.  

Pick a starting point and write the word "start" on or under that sticker.  Pick an end point.  Write the word "finish" on or below that sticker.  You can use  spinners (purchased at a teacher store) or dice or cards or whatever you choose in order to let the players move.  Playing pieces can be just about any small object that will stay in one spot.  I have used small wooden pegs, small cubes, etc.

One game I like to play with the pink game board is called "The Obey Game".  I made cards which have directions written on them.  If you "obey" the directions on the card, you get to move forward the number of spaces written on the card.  I use this as an application game when we study stories in the Bible about obedience.

Instructions:
  • Make a generic game board like pictured above.
  • Print the obey game cards and cut them out.  
  • Mix up the cards and place them in a stack face down beside the game board.  Take turns drawing a card and "obeying" the instructions.  If you obey, you get to move forward the number of spaces listed on the card.
  • Discuss how important it is to obey God all the time!

Fishers of Men Card Game

$
0
0
Fishers of Men Game

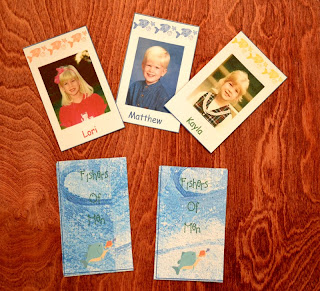
This is an exciting way for children to get to know who the other children are in their class. When the children first arrive in class, I divide them up into small groups. (I have several decks of these cards made up.)  I give each group a deck of the cards and let them play the game which is similar to "Go Fish".  Sometimes I include pictures of missionaries, ministers, or elders so they can get to know who they are as well.

The instructions for making this game are a little more challenging since I was unable to upload a publisher document that can be edited.  

Instructions:.

There are two different ways to make this.  One is to print the .pdf file on the instructions page.  Click here for the instructions page.  Then print and glue the pictures on the front.  Laminate and cut apart.

The second way involves computer work:
  1. Click here and scroll down to "Jesus".  Click on the words "Fishers of Men Front".  Open and save the picture where you can find it again.
  2. Click here and scroll down to "Jesus".  Click on the words "Fishers of Men Back".  Open and save the picture in the same file you saved the first picture.
  3. Open up Microsoft Word or Publisher.  Set your page orientation at landscape instead of portrait.
  4. Click on "insert a picture".  Insert the Fishers of Men Front picture.
  5. Increase the picture size to be the full size of the page.
  6. Insert the child's picture and put it in place.  You may have to format this picture to be in the front.Be sure to make two cards with each picture and name.
  7. Insert a text box and put the child's name.
  8. Continue until all children's pictures are in place.  You will need to make more than one page made like this.
  9. Insert a new page.  
  10. Insert the "Fishers of Men Back" picture.  
  11. Increase the picture size to be the full size of the page.
  12. Print the pages with the children's pictures on the front and the "Fishers of Men" words on the back.
  13. Laminate.
  14. Cut apart.
  15. Play the game!


Daniel and the Lion's Den Magic Window

$
0
0


Daniel and the Lion's Den
Daniel 6
 
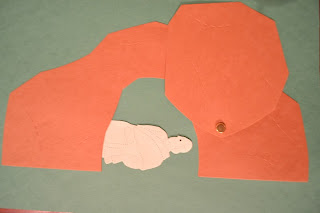
This is another super fun magic window.  The top picture is what the craft looks like at the beginning.  If you pull the card that is sticking out the right side, the angel that closed the lions' mouths "magically" appears in the picture (like the second picture).  Kids are always amazed at this fascinating project.  The older the children, the more they can do on their own.  I have used this for children as young as 3-4, but the only part they can do on their own is color it. 
 
Patterns for this magic window can be found here:
 
 
The magic window pattern was made with clipart from the book Bible Story Clip and Copy Patterns by Corbin Hillam.  This is one of my favorite books to use as patterns for many, many things!  This precious book is no longer in print, so Mr. Hillam has graciously allowed me to give you the pattern for free.  He is producing a CD with the art from this book.  The drawings are fantastic!  If you would like to purchase a CD for $15, you can contact him at corbinhillam@yahoo.com.  It is well worth the money!  Other items by him can be seen at www.corbinhillamdesign.weebly.com.

Jesus' Resurrection Magic Window

$
0
0

Jesus' Resurrection
Matthew 28
In this magic window, we see the tomb where Jesus was laid in the top picture.  The stone is in front of the tomb.  When you pull the tab on the right, you see that Jesus is no longer in the tomb and the stone is rolled away!
The magic window pattern was made with clipart from the book Bible Story Clip and Copy Patterns by Corbin Hillam.  This is one of my favorite books to use as patterns for many, many things!  This precious book is no longer in print, so Mr. Hillam has graciously allowed me to give you the pattern for free.  He is producing a CD with the art from this book.  The drawings are fantastic!  If you would like to purchase a CD for $15, you can contact him at corbinhillam@yahoo.com.  It is well worth the money!  Other items by him can be seen at www.corbinhillamdesign.weebly.com.


Abraham Offers Isaac Magic Window

$
0
0


Abraham Offers Isaac
Genesis 22:1-19
 
 
And yet another magic window!  This time the top picture shows Abraham as he is just about to offer Isaac.  When you pull the tab on the right, the ram  "magically" shows up in the bush! 
 
Patterns for making this magic window:
 
 
This project was made with a pattern from the book Bible Story Clip and Copy Patterns by Corbin Hillam.  This is one of my favorite books to use as patterns for many, many things!  This precious book is no longer in print, so Mr. Hillam has graciously allowed me to give you the pattern for free.  He is producing a CD with the art from this book.  The drawings are fantastic!  If you would like to purchase a CD for $15, you can contact him at corbinhillam@yahoo.com.  It is well worth the money!  Other items by him can be seen at www.corbinhillamdesign.weebly.com  


Jesus Raises from the Dead Moveable PIcture

$
0
0

Jesus Raises from the Tomb
Mark 16, Luke 24

When telling this story, I use this almost magical visual.  I make the tomb with a slit behind it.  I slide the Jesus figure through the slit so that half of him is hanging out the back of the page and the other half is showing as if he were lying in the tomb.  Turning the picture toward the children with my fingers in front beside the tomb and my thumb behind the page holding Jesus in place, I tell the story.

I let the kids help me roll the stone in front of the tomb.


As I tell the rest of the story, I use my thumb and slide the Jesus figure to my right so that he is out of the slit completely and on the back of the page.  I hold him tightly with my thumb so he doesn't fall.  I then have the children help me roll the stone away.  Jesus has magically disappeared!  Jesus has risen!  The grave cannot hold him!

For detailed instructions with pictures and patterns, click here.


Fishers of Men Game

$
0
0
Fishers Of Men Card Game

This is a card game I like to make and play so the children can get to know one another better.  Sometimes I insert pictures of the ministers or missionaries or the elders so they can get to know who they are.

Deal five cards face down to each player.  Put the remaining cards in the middle to be the "fishing" pile.  Decide who goes first.  Player 1 asks the other player if they have a card that matches one of their own cards.  For example, "Do you have a picture of Cathy?"  If the player has a picture of Cathy, he gives it to Player 1 who then has a match.  Player 1 lays the match down in front of them and asks another player for a card.  Continue until the player does not get matching card.  At that time, the player says, "No, I don't.  Fish for men."  Player 1 draws a card from the "fishing" pile and keeps it.  Player 2 now asks the other players for cards to find matches in his hand.  Continue until all the cards in the "fishing" pile are gone or all the matches are made. 
Count to see who has the most matches.


In order to make this so that people can add their own children's pictures, I am linking the above pictures so you can insert them into Word, Publisher, or something else.  Resize the pictures to fit the page and then insert your children's pictures on top of the page with the little fish.  Print the blue page on the back.

For instructions, click here.
Front of the card  Look under Application Stories and click on Fishers of Men Front of Card.  (Insert a child's picture in each box.  Be sure to make two cards of each picture.)
Back of the card  Look under Application Stories and click on Fishers of Men Back of Card.

What Goes In Is What Comes Out

$
0
0
What Goes In Is What Comes Out

This application was made from a brown grocery sack.  I drew a picture of a boy on the front and cut out a circle for the mouth.  I talk with the children about the types of things they are listening to and watching.  These are the things that go into our heads and our hearts.  We discuss movies, music, gossip, discussions with friends, etc.  As we discuss these items we write them on a strip of paper and put them in the top of the sack.  Then we talk about what kind of words we want to come out of our mouths.  We reach in the hole where the mouth is and pull out the strips of paper or just lean the sack over and see what spills out.  Sometimes things such as kind words come out of our mouths but sometimes bad words and bad songs come out of our mouths.  We make the application that what goes in our minds and hearts is what comes out of our mouth.  Then we discuss how we can put good and kind things in our hearts so that good and kind things can come out of our mouths.

Pocket Folder Puppet Stage

$
0
0
Abraham's Three Visitors
Pocket Folder Puppets
Genesis 18

What a fun idea from a friend!!  This puppet stage was made from a simple pocket folder without brads in the middle.  I purchased a large group of them for 10 cents when they had them on sale this summer with the school supplies.  I recommend purchasing a colored folder.  One that has the color on the inside as well is best.  This one was white on the inside.  (If you have one with brads, just take the brads out.)

To make this exciting on-the-go puppet stage:

If the inside is white like ours was, glue a large piece of blue construction paper to the inside for the sky and a strip of tan paper on the pocket section for land.  (This could be adjusted for many other stories.  Light blue sky, dark blue water.  Black sky, tan land.  So many options!!)

We made the characters and scene using a Cricut machine.  I glued the people to popsicle sticks but did not glue the very bottom of the people to the stick.  This allows the people to stay put better.  The people are placed with their feet on the outside of the pocket and the stick on the inside of the pocket.  (See the second picture where Sarah is being inserted into the picture.)

The children enjoy manipulating the pieces and retelling the story.  Then to store everything, just put the pieces in the pockets and close the folder!

I plan to make several different versions of this project!

Samson and Delilah

$
0
0


Samson and Delilah
Judges 16


I made these figures to use for telling the story of Samson and Delilah.  I used a technique called "tissue art" to create them. I used regular tissue paper that you would use in a gift sack. I found a pattern in Corbin Hillam's book Bible Story Clip and Copy Patterns.  I just love the characters!  I used tissue paper for the clothes and shoes and used pastel chalk for the skin.  The tissue art is quick and simple - much easier than it looks here and it has such a beautiful look when it is finished.  This technique can be used for many other things including making your own cards. 

I made a video to show you the technique:


From now on, save all your tissue paper from birthday parties, Christmas, baby gifts, etc.!  You never know when it will come in handy for tissue art!

Patterns are used with permission by Corbin Hillam.  To purchase a CD with his precious artwork in it, e-mail him at corbinhillam@yahoo.com.

Abraham and Lot

$
0
0


Abraham and Lot Separate
Genesis 13

More tissue art.  These are quite fun!

These are some figures I made to tell the story of Abraham and Lot. I made these using a technique called "tissue art".  I used regular tissue paper that you would use in a gift sack for all the clothes. The technique is simple and quick and makes the projects turn out beautifully.  It's much quicker than coloring and looks a ton better too. I used pastel chalks to color the skin.  I used patterns from Corbin Hillam's book Bible Story Clip and Copy Patterns.  The characters are precious and make great patterns for many things!

I made a video of this technique:

http://youtu.be/jlkubYlGPg0 

Save all your tissue paper from birthdays, Christmas, baby gifts, etc. (Even save the wrinkled pieces.  Those pieces add texture.) It will all come in handy for this type of project. 

Saul is Lowered Over the Wall Moveable PIcture

$
0
0
Saul is Lowered Over the Wall
Acts 9:1-31

For this craft, I purchased scrapbook paper that looks like rocks and cut it to the size I wanted.  I made Saul using the Cricut machine.  The clear piece of plastic is lamination film left over from laminating other projects.  I cut a slit in the top of the scrapbook paper about an inch down and inserted the lamination strip there. Pull up or push down on the lamination strip to make Saul be lowered or raised over the wall.

Plain Paper Sack Felt Board

$
0
0


 Plain Paper Sack Felt Board

I created a craft to go along with the application of being a missionary and sharing the stories in God's Word with others.  This is just a simple, plain white paper lunch sack.  I glued a small rectangle of black felt to the outside.  I then cut out pieces (using an Ellison die cut machine though you can use any pattern) to go with several different stories.  I put the pieces to each story in a Ziploc bag and labeled the bag with that story.  I made many pieces so the children would have several different stories to retell.  The Ziploc bags with pieces store inside the sack (if you flatten the bag by getting out most of the air).  The children spent part of the Bible class time using their pieces and telling each other the Bible stories.  Then they took the paper sack felt boards home and tell the stories to as many people as they could.  They were excited to go home and tell their parents, grandparents, and even many of their friends!

Tissue Art Card

$
0
0
Tissue Art Cards

These cards were made using the technique called "tissue art".  I used regular tissue paper made for gift sacks.  The technique is extremely simple and takes very little time.  I just love the way the tissue adds color and texture!  On the inside of the cards, I write my own notes or phrases.  I use them when inviting people to Bible class, telling them we missed them, for birthdays, and many other ways. 

For instructions on how to make easy tissue art projects, watch the following "how to" video:

For the bees wings, I crumpled the paper first and made sure it was wrinkled as I put it on.  I did not laminate the cards but I did go over the lines with a Sharpie to give it a much neater and more finished look.

Jesus At the Temple Blacklight Story

$
0
0


Jesus at the Temple
Luke 2:39-52

Using blacklight stories always grabs the children's attention.  Just turn off the lights and turn on the blacklight.  (Hint:  Be sure to wear dark clothes.) I made this story to tell of Jesus "getting lost".  My favorite page is when Jesus cannot be seen because of the crowd in front of him.  Then if the crowd is moved, there he is!  He is teaching listening to the teachers and asking them questions.  

I made this story using the Ellison die cut machine with fluorescent paper.  I didn't have a little boy die cut so I had to use the Cricut.  The whole story can be made using the Cricut.

Viewing all 62 articles
Browse latest View live